
How to Repair Buckled Hardwood Floors
Identify the causes of hardwood floor buckling and learn best practices for repairing buckled hardwood floors and what to avoid.

How to Repair Buckled Hardwood Floors
Identify the causes of hardwood floor buckling and learn best practices for repairing buckled hardwood floors and what to avoid.
Flooring contractors who have been in the business for any length of time know all too well the misfortune of hardwood floor buckling, and all the problems and headaches that come along with buckling wood floors. In this article, we’ll take a look at what causes wood floors to buckle, as well as provide education on the next steps on how to fix the problem. So if you’re currently dealing with floor buckling, continue reading to learn from the wood floor experts on wood floor buckling repair.
What causes buckled hardwood floors and what are the signs that they need repair?
The two main causes of wood floor buckling are improper installation and environmental issues. By following proper installation guidelines by organizations such as the National Wood Flooring Association (NWFA), contractors will be able to successfully install wood floors without subfloor issues. Begin with getting the building ready for the flooring, then get the flooring ready for the building. Conditioning the space is about getting the relative humidity aligned to the expected occupants’ comfort levels.
Wood flooring planks must be acclimated prior to installation. Acclimation is the process by which the planks are placed in the room of their intended installation for up to two weeks beforehand depending on the environment. The acclimation process allows wooden planks to properly adjust to their new environment along with its humidity and temperature. If and when wood flooring planks are not sufficiently acclimated, the wood can expand or contract, post installation, which then may result in wood floor buckling. Be aware, it is not enough to simply place the wood in stacks in the building. It should be cross stacked and spaced apart to encourage air circulation around the boards. If stacking on concrete, place 6-mm plastic down first. Next, put down some 2x4s, and then set your bundles of wood on the 2x4s. For advanced acclimation discussion, check out the On the Floor with Wayne and Rob podcast episode, Discussing Acclimation with Lenny Hall.
Humidity and water damage can lead to buckled hardwood floors
Sometimes hardwood floors are faced with unexpected environmental extremes that lead to floor buckling. Perhaps there was a plumbing leak or an appliance that failed and caused a flood, or maybe the humidity level was too much to bear. Moisture from a concrete subfloor can cause wood floor buckling. Whatever the cause of the problem, it’s important to identify it and remedy the situation before proceeding.
Floor buckling
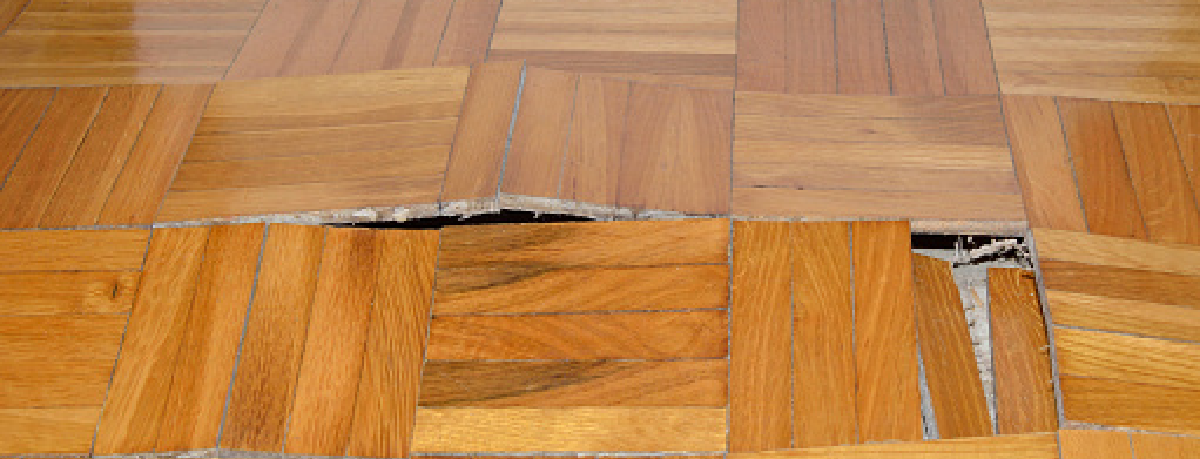
Hardwood floor buckling occurs when floorboards move upward into a convex shape. Other terms, such as peaking (more prominent grooves in the hardwood that rise higher and involve areas including multiple floorboards), lifting (cases in which floorboards pull up from the subfloor) or crowning (areas of the floor in which boards rise up in the middle due to excess moisture) also come into play. Each matter is a cause for concern, as they create hazards and are unsightly.
How to fix buckled hardwood floors - step-by-step instructions
First, remove the baseboards
- Being mindful to avoid cracking the wood or scratching the surfaces, carefully take the baseboards from the wall. Although a 5 in 1 tool and pry bar or hammer will sometimes be sufficient, very often the baseboards have been caulked and sealed, and so it’s necessary to score the caulk along the top of the baseboard with a sharp utility knife before removal.
- Move the knife steadily along the caulking seam as to prevent slippage and accidental cutting or scratching of the baseboard. Once you’ve scored the caulk seam, you’ll want to gently take your knife and make it as close to flush with the surfaces of the wall and the baseboard.
- Carefully wedge the blade between the baseboard and the wall, then drag your knife toward the corner while putting just slight pressure against the wall –– again, taking care not to cut or damage the surface. Be sure to cut through the caulk joint in the corner as well.
- Now, take your 5 in 1, and with the beveled edge down, slide it underneath the floorboard so you can lift it from the floor a bit. Once you have this extra space, you’ll be able to fit in a more substantial tool, i.e., a pry bar.
- The idea, now, is to gently lift the baseboard up and away from the wall. Doing so will bend the nails in the baseboard a bit, which is okay. This will allow you to carefully pull the baseboard away from the wall without cracking it.
Replace the floorboards that are damaged
- Sometimes floorboards are just too warped or damaged and need to be replaced. In these cases, you’ll want to remove the damaged boards and install new flooring to replace them. To ensure the stain color is correctly matched you can purchase hardwood that is pre-stained, or consult a wood flooring professional for best next steps to color match.
- When installing the replacement boards, remember to leave enough room between them for expansion (this is a very small space –– you shouldn’t be able to see the subfloor). Also, be mindful to leave enough space between the flooring and the walls. This space will be covered by the baseboards. These are proactive measures that prevents future problems!
- Be aware that you need to go back with not only the same species of wood, but the same grade of wood as well, such as common, select and better, or quartersawn. At times, there will be a color difference initially even if you do use the same species and grade.
Some customers may attempt wood floor buckling repair
As a professional flooring contractor, this is where you can confidently step in. If a customer is contacting you about a floor buckling problem and asking you for tips on how to fix the issue, chances are, they will need more help. Schedule time for an estimate so you can assess the damage and determine the cause. It is important to bring your moisture meter to check the RH (relative humidity), and the moisture levels of the flooring and subflooring.
The most important consideration is timing to proceed with the repair. The cause of the moisture must be determined, and the subfloor moisture content must be corrected before new flooring is installed.
Moisture blocking
When installing new hardwood floors, It’s important to choose an adhesive with moisture blocking properties, such as Bona QUANTUM R851.

Bona QUANTUM R851
One-component, silane-based wood floor adhesive. Bona QUANTUM™ R851 is a silane-based, adaptable wood floor adhesive with outstanding green-grab and easy application that doesn't cause fatigue. Quick and efficient, flooring can be ready in as little as one day for furniture and foot traffic.
Put the power of the most trusted name in flooring behind you
As a Bona Certified Craftsman, you don’t simply have the name of an industry leader to back you. You have the benefit of an entire network of tenured professionals, top-level resources and the best flooring products for your flooring business. From training to lead generation, and from marketing support to networking opportunities, you will have a world of advantages. Find out if becoming a BCC is the right move for you!
Bona Certified Craftsman Program
Bona Certified Craftsmen are hand-picked, proven, top-level professionals. Once prequalified, trained, and tested, the exclusive sales and marketing tools and professional resources are made available to help drive sales and achieve your company’s ultimate goals.
